Do you suffer from back pain?
The low back... right where your spine and your hips meet?
Did you know one of the major causes of this low back pain are the muscles that flex your hip joint?
Tight hip flexor muscles can cause:
-
Your hips to be tilted forward.
-
Weak abdominal muscles.
-
Weak glute muscles.
-
Pain the low back and issues with your SI joint.
Let's keep this article short and cover 3 of my favorite stretches and 2 of my favorite trigger ball smashes you should start doing on a daily basis.
Pre Hip Flexor Stretch Roll Out
1. Quad Roll And Smash


You will need a foam roller for this mobility stretch.
I recommend the 12 inch basic foam roller from Amazon . It's inexpensive and rolls muscle tissue better than those expensive and flashy rollers.
This quad foam roll is a great warmup roll to increase blood flow into the muscle tissues you'll be stretching. Plus you'll be able to find the sensitive trigger spots or knots you'll want to focus on after your hip flexor stretch session.
Step 1
Lay your thigh on your foam roller right above the knee.
Step 2
Slowly roll all the way up to your hip (illiacus) area and return doing back down the thigh at a slow steady pace.
Step 3
Make sure you hit a little on the inside... a little on the outside... and right in the middle as you roll.
Do this for 60 seconds per thigh.
Again, pay attention to the small, specific spots that are more painful.
3 Hip Flexor Stretches
2. Knee Into The Corner Of The Wall Stretch
I learned this stretch from Kelly Starret and his book Supple Leopard . It's a great book if you're a fitness professional.
This is a stretch that will target your quad muscles. Specifically, you'll hit your rectus femorus plus others.
There are a couple variations of this stretch based on how mobile and flexible you are. Let's go through each one...
Version 1: Couch Version Stretch

I am demonstrating this with a box pushed against the wall. But if you have a couch or comfy chair that's not too deep... use that for comfort.
By elevating your knee, you'll take a lot of intensity off your knee and quad muscles. Plus your foot is not pressed against a wall flat. Because you're standing, your back calf is not forced against your hamstring.
Step 1
Carefully place your knee into the corner of the box/couch/chair so it's right up against the back. The top of your foot is flat against the back of the chair or wall you're using.
Step 2
Keep your hips as square as you can as you stand straight up. Try to squeeze the butt cheek of the back leg.
Try not to lean forward too much, but listen to your body too. Don't force anything if it doesn't feel right.
Work hard to keep your hips square because this will ensure you feel the stretch in the back leg's thigh, all the way up to the front of your hips.
Version 2: Floor Version With Hands On Ground

Let's do the same thing but now you'll be on the ground. This is very intense so listen to your body.
Step 1
Place your knee into the corner of the floor and wall. Your back leg is going to be pressed directly against the back wall.
Step 2
If you're tight and you'll probably feel this in your back thigh already... I suggest you use the couch or chair version. Work into this stretch. Take your time.
You want to step your front leg out so it's bent in-front of you. This is where you'll feel your back leg's quad start to stretch. It could be intense, so listen to your body.
Keep your hands on the ground here. DO NOT lift your upper body.
Step 3
Try to lightly squeeze the butt cheek of your back leg... work hard to keep your hips square... and breath slow and deep.
Hold this stretch for at least 60 seconds.
Version 3: Floor Version Upper Body Against The Wall

Last version of this stretch. Let's just continue with the steps from the hands on the ground version.
Step 4
Bring your hands to your knees so your upper body is angled at about 45 degrees.
Stay here for 60 seconds and feel this position out. If you're tight... this can be a very intense position.
Step 5
Ultimately you want to work your upper body all the way up and pressed against the wall.
I can't do this just yet... but I am getting there.
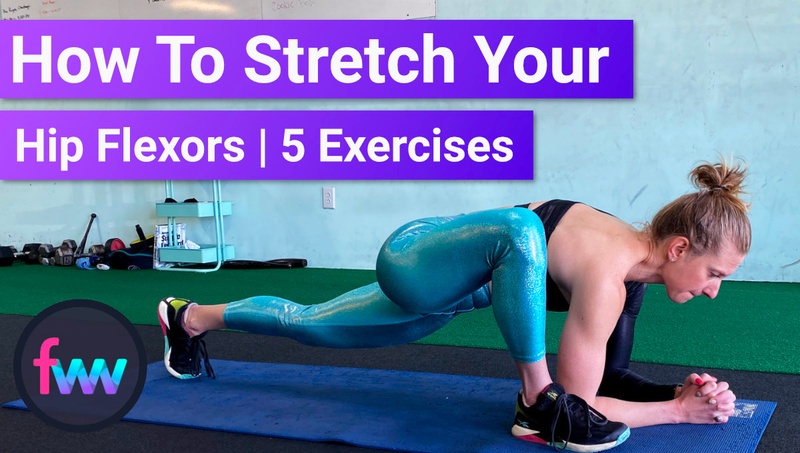
3. Easy Lizard


I love this stretch. Just like the knee into the wall stretch... the focus is on the back leg.
I'm sure you've done this stretch before in a yoga class. This is why I call it lizard... I think lizard is the American name for this pose.
Step 1
Start standing up and take a big step back like you're doing a reverse lunge.
Step 2
Place your knee on the ground and walk your front foot to the outside of your shoulder line... just a little.
Step 3
Keep your front knee over your ankle... slightly in-front would be better. Make sure you lock your knee into position... scooch your back knee as far back as you can. You want to have a nice wide stance and feel a stretch in your hips.
Step 4
Place both hands, shoulder width apart, on the floor... to the inside of your front foot. Drop your hips as much as you can.
This position puts your back hip into extension... the opposite of flexion. Going into extension is going to stretch your:
-
Rectus femoris
-
Satorius
-
Illiacus
-
Psoas
Take Lizard To The Next Level
See if you can get your forearms on the ground. This will force your hips a little lower and to go more into a split position.
It's a great stretch. Are you ready to take it up another notch?
4. Hard Lizard


Restart above at step 2... but rather than place your knee on the ground...
Step 2
Keep your back leg as straight as you can. Never let your knee hit the ground.
Step 3
Place your hands on the ground, shoulder width apart... and slightly inside your front foot.
The only difference to this point is your back leg is fully extended... and you are actively extending it. This is what makes this stretch so good and so tough.
Step 4
Squeeze your back legs butt cheek. This will help to square your hips and you'll get that great stretch is every hip flexor muscle. This is one of my favorites.
Hold this for 60 seconds.
Take It To The Final Level
See if you can get your forearms on the ground... with your back leg fully extended... and squeezing your butt cheek.
It's HARD! But a great stretching and mobility drill to work on.
5. Psoas Smash

You need a trigger ball for this mobility exercise.
I suggest Jill Miller's Alpha Ball ... or Kelly Starret's Supernova . Read my full review of the best massage balls and which ones I think you should purchase.
I am going to use the Alpha Ball.
You'll also need a yoga block.
Step 1
Place your trigger ball on the yoga block.
Step 2
Lay over your trigger ball. You are going to put the trigger ball right next to your belly button... about an inch away... and lay into the ball.
It will dig into your stomach.
Step 3
Breath deep and slow. As you exhale, relax your abs so the ball sinks into your gut.
If you're like most people, you'll feel a pain. It's not sharp, but still intense... it's hard to explain. This is your psoas.
The psoas is a muscle that is deep in your abdomine.
-
It's attached to your spine just below your rib cage.
-
It runs all way the down to the base of your hips.
Not only does your psoas help with hip flexion, it can be one of the key reaons your low back hurts because of a forward pelvis tilt.
This is one of my favorite smashes. Do it often and your body will feel incredible.
Recap My 5 Favorite Hip Flexor Stretches
-
Warm up with foam rolling all of your quad muscles
-
Knee into the corner or the wall stretch (remember all the variations)
-
Lizard pose
-
Hard lizard pose
-
Psoas trigger ball smash
This routine will take you about 10 minutes to complete since you have to hit each thigh. I would try to do the full routine at least three times per week.
If I were to pick two stretches to repeat daily...
-
Knee into corner or wall
-
Psoas smash
If you sit a lot during the day, these two will make a huge impact on your hips and low back.
If you have any questions, let me know on my social accounts or my YouTube channel .
If you want to get more routines... fully filmed... where I lead you the entire way, go learn more about Fit Women's Weekly LIVE. If you like what you see, sign up FREE for a 14 day trial . It's a 14 days where you can workout with me LIVE online or watch recorded workouts.
Fit Women's Weekly LIVE is my premium online training program .
Now, go do this routine and start feeling instantly better. Let me know how it works for you. I am off to go smash my Psoas. I need it!


